Using Packages with JBuilder
The following are step-by-step instructions for setting up an applet
that uses packages in Borland JBuilder (versions will vary slightly).
This is basically an extension of another page on Working
with applets in JBuilder from my ICS
111 page. I'm just modifying/adding to reflect the use of packages.
1. Load JBuilder
2. Close all projects by clicking File -> Close All
3. Choose your output directory:
Go to the JBuilder menu bar and click Tools -> IDE
Options.
Note: JBuilder 2 users should instead choose Tools -> Default
Project Properties.
Look for the option for specifying 'Default Out Path' or 'Output
root directory'.
Click the Browse button next to it to specify the location that you
wish to use as your root directory for your packages. Then click OK.
Repeat this step for the 'Source root directory'. This tells
JBuilder where to save your .java files.
4. From the menu, click on File -> New...
5. Choose 'Applet' and click OK 
6. Enter data in the Project Wizard window:
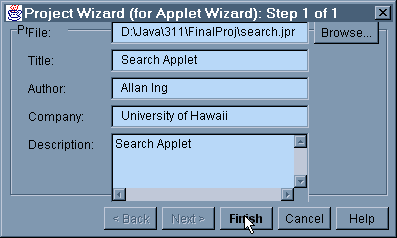
The first line, 'File:' is asking you to specify a project
to work with in JBuilder. This is will be the name of your 'project' that
you will be working with in JBuilder. You can change the path if you wish.
However, this line must end with a filename ending with the .jpr
extension. Choose a one-word, short filename for your project. It MUST
end with .jpr. Other than that, the filename is relatively unimportant.
JBuilder will create a .jpr file that keeps track of all of your .java
files that you'll use in the project. Filling in the rest of the items
is optional. Click Finish to continue.
6. Enter data in the Applet Wizard window:

IMPORTANT:
In the Package line, enter the name of the package for the Applet.
For Class, enter the name of your applet class.
You should see the name of the applet in the File area, along with the
package name as its containing directory.
Leave everything else unchecked. Click Finish to continue.
JBuilder should now have your applet configured so that you can view
it by selecting either the applet's .java file or the .html file in the
upper-left frame, then choosing Run -> Run Applet in "gui.MyApplet.html"
(or hit F9).
You can now add the rest of your classes to the project by following these
steps:
7. Choose File -> Open/Create or click on the 'plus' icon: 
The following window will appear:
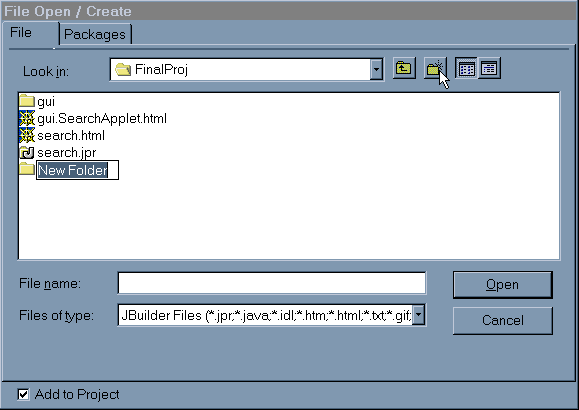
To create a package, all you need to do is create the directory for it
and save the new .java file in the new directory. To do this, click the
Create New Folder icon in the upper right corner (where the mouse pointer
is positioned in the above pic) then name the new folder according to
your desired package name. Next, double-click the new folder to view its
contents (it shouldn't have anything yet). Enter the name of the .java
file where it says File name (exclude the package name). Make sure "Add
to Project" is checked. Click Open to continue.
Example of adding a class named "SearchNode" into a package
called "util":
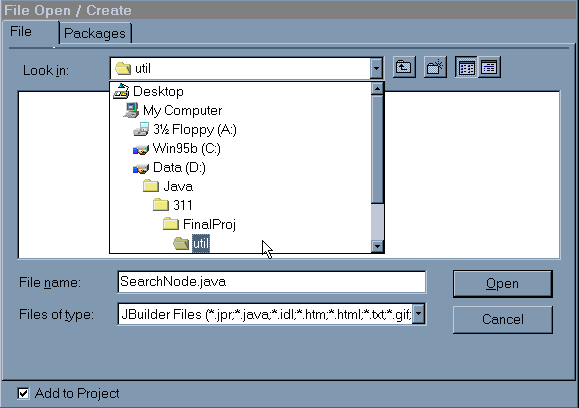
This screenshot was taken after creating a new folder named "util"
and entering it. I pulled down the directory list to show that the "util"
directory is a subdirectory of the main FinalProj directory (which is
the root directory for this project).
The new class should new be added to your project! If you're unsure and
you want to make sure JBuilder did what you wanted it to do, you can highlight
the newly created class (in the upper left window frame) and look at its
class path in the title bar of the Project window. It should show that
the corresponding .java file is located in the correct packagely-named
subdirectory.
Last modified: 04/28/00
|